
Getting set-up is easy
Few quick tips before you begin, that can ease the process for you
- Have the Uber app installed on your mobile device. Are you a new rider? – First create a personal profile on your Uber app (with phone no. & email address) before you start the activation process
- Your personal Uber profile must have email address updated (Check the FAQ section)
- For a smoother set-up, complete the linking process from your mobile device rather than desktop
Let’s begin
Check for your inbox for the Uber for Business invite
Click here to request a re-send of the invite
If you are activating in app, follow the below steps

Step 1
Open the email invite sent in your work inbox & click on ‘Get Started‘
Step 2
Click on ‘Join the account‘
Step 3
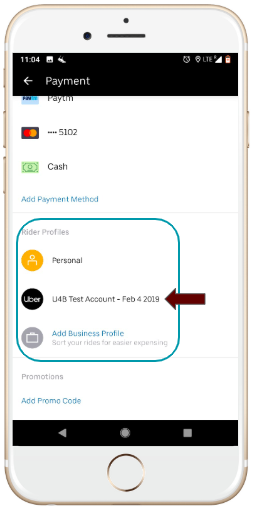
Check if activation has been successful or not. Open your Uber app menu, go to ‘Payment‘, scroll down to the ‘Rider Profiles‘ section & you will be able to see your business & personal profile
Step 4
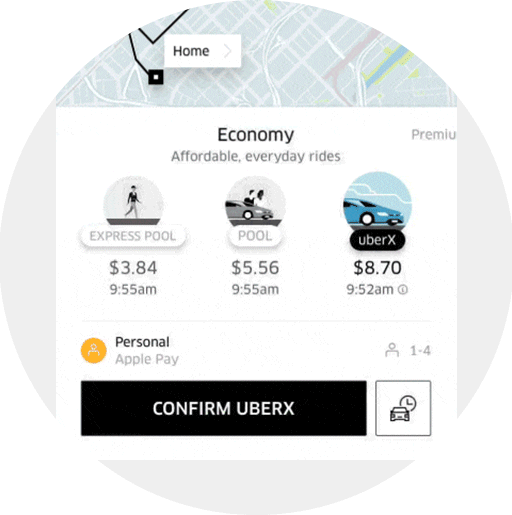
Launch the app to ride. Select your Company’s Uber for Business account before you confirm your ride.
If you are activating through a web-sign in, follow the below steps

Step-1
Click “get started”. This is a unique invite link & will only work for you. Please do not forward your invite or use your colleague’s invite link

Step-2
Already have a personal rider Uber account? Click on “YES, SIGN IN”
New rider? Click on ”No, create a new Uber account”

Step-3
Sign in using your personal rider profile details – email or mobile number
(Pro tip: For an easier set up – plug in your email address)

Step-4
Enter your Uber rider account password.
Forgot password? Hit the “Forgot password” button on the bottom left side of the screen

Step-5
Voila! Your account is activated!
How to check if your account is activated

- Open your Uber app menu,
- Go to Payment,
- Scroll down to the ‘Rider Profiles’ you will see your Business profile as well as your Personal profile.
How to add a payment method

Depending upon the programme & policy set by your company, you may be asked to add an alternate method of payment on your Business profile
- Open the Uber app
- Go to the Menu bar (top left)
- Go to ‘Payments‘ section
- Scroll down to the ‘Rider profiles‘ section
- Tap on your Company’s Uber for Business profile
- Select/add your payment method for your business profile
Common activation related FAQs
- I forgot my password
- Click on this link to reset your password.
- For further queries visit our help centre
- Still need help? Drop your number here to request a call back
- Facing OTP issues/ Did not receive an OTP
- Click here to know more
- How to update email id/phone number/name/password on your personal profile
- Select "Settings" in the main app menu
- Tap the bar that displays your profile information
- Tap the information you want to change.
- Make your updates and click save.
- New device/handset needing verification
- Write in to business-support@uber.com & request for help with verifying your new device
- Check if my account has been linked to my company’s Uber account
- Select "Settings" in the main app menu
- Go to Payment and scroll down to the “Rider Profiles” section
- I am asked to add another payment method
- Depending upon the programme & policy set by your company, you may be asked to add an alternate method of payment on your Business profile
- Open your Uber app >> Menu bar >> Payment >> Scroll down to 'Rider profile' >> Tap on your company's Uber for Business profile >> Add/update your payment method
- Toggle between business and personal profile
When you request an Uber, switch profiles by tapping “Personal” or “Business.” You can also switch during a trip by swiping up on the app's screen.
Wondering if you can toggle profiles in between your trip? Yes you can!
Still not done? Don’t worry, leave your number here & request for a call back!
Posted by Uber for Business Team