The complete guide for using Uber Business Profiles
If you are using Uber for business purposes, your business profile helps you easily manage travel and simplify your settlement process. With your business profile you can choose a personal or business ride and easily download tax documents for every ride, by accessing your user profile.
Read the guide below to find out anything you need to know to use your business profile!
What are business profiles?
Profiles are a new way for riders to manage their travel. The feature allows riders to create different account profiles under their master rider account. Each profile has a default email and payment method, allocated by the rider. When the rider takes a trip on a given profile, the trip will be automatically charged to the default payment method, and trip receipts will be sent to the default email address.
Profiles are specifically intended for riders interested in separating personal trips from business trips. When a rider creates a business profile, they can associate their corporate card with the profile and have all receipts sent to their business email. Business profiles also have a couple of unique features, including the option to receive weekly or monthly business travel reports, and add expense codes and memos to each trip.
What aren’t business profiles?
The business profile is NOT a B2B service (Business to Business) dedicated to companies and it doesn’t allow for invoices to be issued on a legal entity. This is Uber for Business which will be launched soon in Romania (more details here). The Business profile is a service which allows individual users to attach more cards to their Uber account in order to organize more easily their rides, hence facilitating the expense process.
Business profiles integrate directly with some of the most used expenditure reimbursement programs, globally: Concur, Expensify, Certify and Chrome River. Thus, Uber will automatically send bills for all your business rides.
How to create your business profile?
- Open the Uber app menu (upper left corner) and select „Settings”
- In the ”Profiles” section select „Add a Business Profile” and tap the ”Create” button
- Add your professional e-mail address. You will receive a report of your trips, monthly and weekly on this address
- Select / add payment. Add your business card or select one of the existing payment methods. Attention: You cannot add Google Wallet or ApplePay
- Choose the frequency of your reports. Select the frequency you want to receive your reports: you can either choose a weekly or a monthly report
- Summary. At the end, you will see the summary of your business profile – the app will automatically create a personal profile by using the data from your user account (e-mail address and payment method you used prior to creating your business profile)
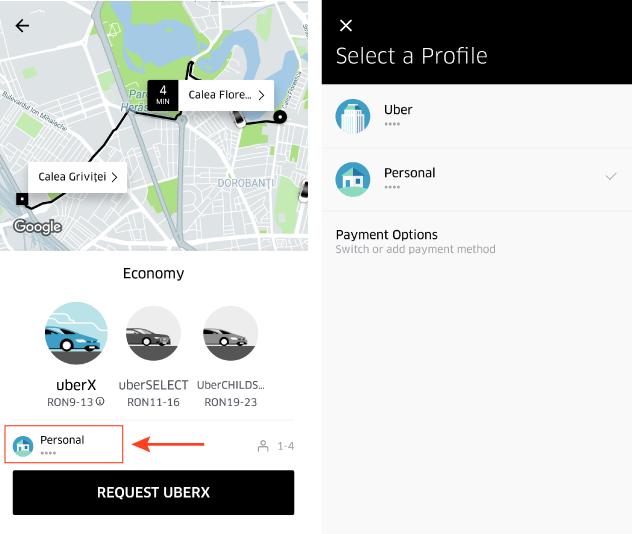
Select the profile (personal or business) before requesting a ride – Select the profile (personal or business) before requesting a ride – in order to choose the profile you want to use for your next trip click on the icon in the upper right corner of the screen.

How to edit a business profile?
You can edit your business profile directly from the Uber app. Attention: business profiles are not available on http://riders.uber.com. To edit your business profile:
- Open the menu of the Uber app (upper left corner) and select „Settings”
- Scroll down to “Profiles” section and you will see a list of all the active profiles. Select one of the profiles to edit
- After you selected a profile, you can check and edit the name, e-mail address and the associated credit card. When editing your business profile you can also modify the frequency of travel reports.

You have two ways to select the right profile for your next ride with Uber:
From the main screen of the app
- Click on the icon in the upper right corner of the screen
- Select which profile you would like to use for your next trip
From the order screen
- Open the Uber app, set the pick-up location for the car and then tap “Where To?”
- Choose the right profile for your trip before tapping the Request button (bottom of the screen)
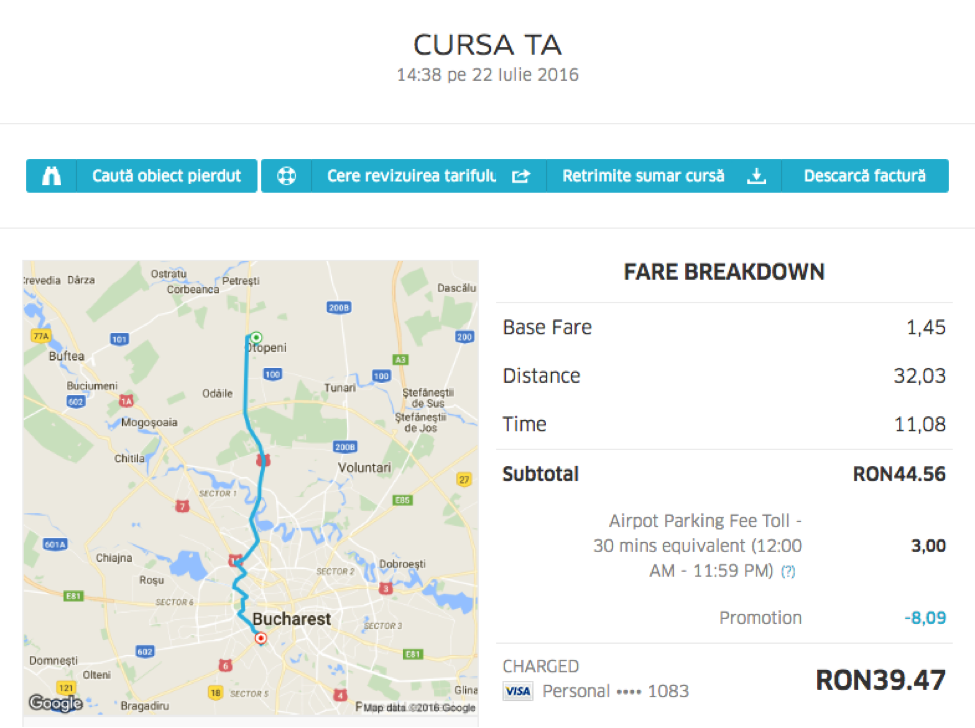
How do you download your invoices?
- Access your user account at https://riders.uber.com/trips
- Select the trip you want the invoice for (simply click on the trip) and then press “Details”

- Press “Download invoice” to get your invoice for the ride
How to expensify your business trips?
To expensify your business rides, you need the invoice for every ride and a deduction of expenses.
The invoices are issued by Uber in the name of the partner driver (under article no. 319) paragraph (19) in the Tax Code and are issued in a simplified banners, under the terms of art. 319 par. (12) and art. 319 art. (13) from the Tax Code.
Any more questions?
Use the Help section in the Uber app or simply access http://help.uber.com. You can also find us on Facebook, Twitter, Instagram and blog!
Enjoy the ride!